These Breakfast Sandwiches are great to have on hand for those busy mornings. You can prepare a batch and keep them in the freezer until you are ready to use them. I prefer to thaw them out in the refrigerator overnight to help make reheating a bit easier. However, I have provided the steps needed to reheat these sandwiches from frozen and thawed-state below.
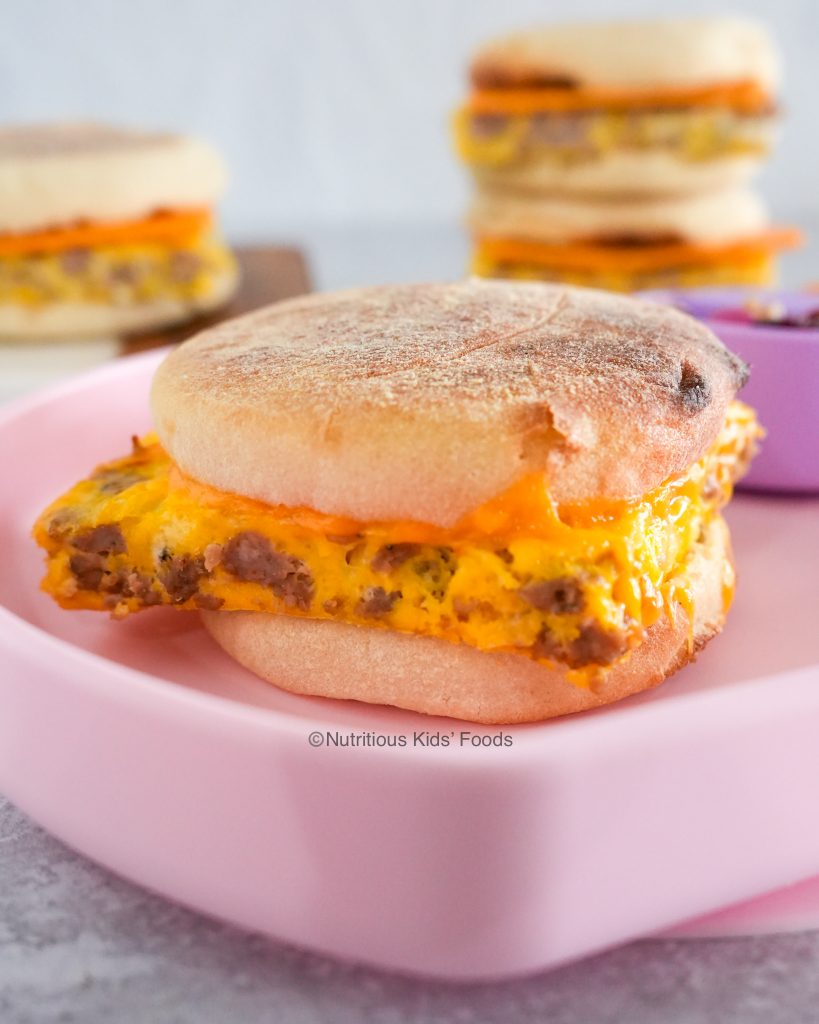
When preparing these sandwiches, I first cook the sausage in a skillet, then combine then with the rest of the ingredients. Finally, the sausage, eggs, and the rest of the ingredients bake in the oven. I decided to cook the sausage with eggs to prevent cooking them separately which can help save some time. However, the sausage can be formed into patties before cooking and assembling them with the cooked eggs.
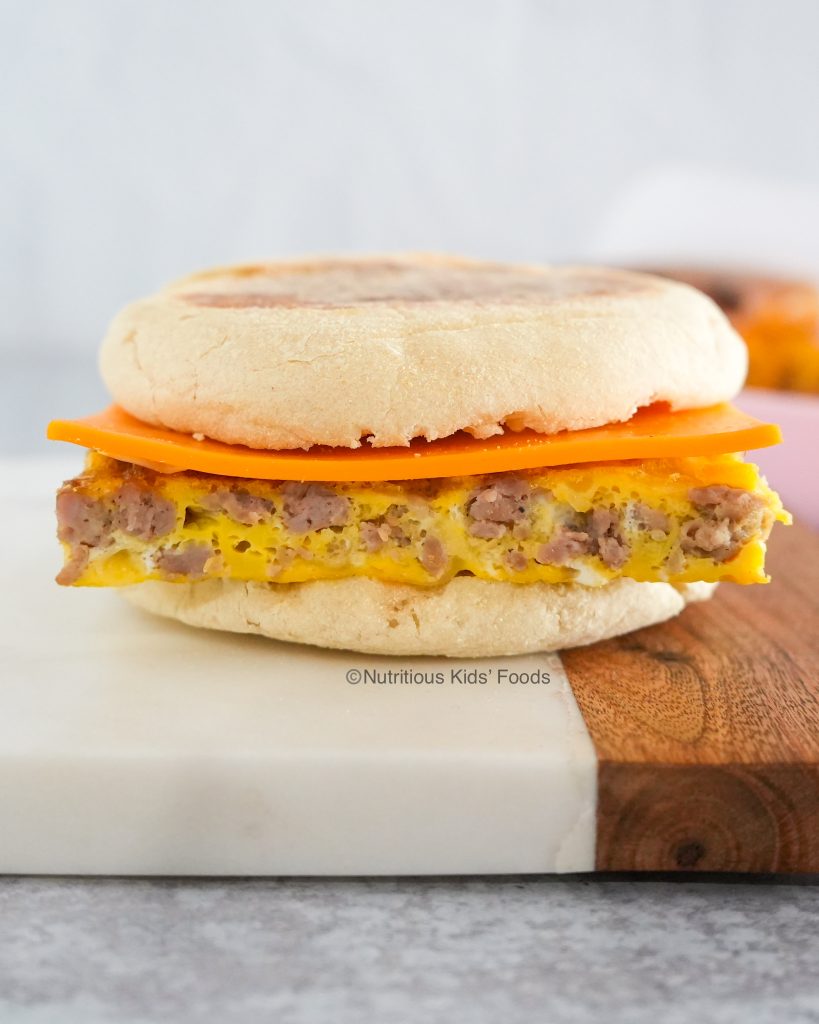
The Breakfast Sandwich above is how it looks assembled before being wrapped to place in the freezer: English muffin, the cooked sausage egg mixture, and a slice of cheese. Once the sandwich is reheated, the cheese will melt resulting into a tasty combination.
PrintBreakfast Sandwiches, freezer-friendly
These breakfast sandwiches are great to have on hand for those busy mornings. The sausage is cooked in the skillet before being combined with the rest of the ingredients to be baked in the oven. For best results, thaw the sandwiches in the refrigerator for 12-24 hours before reheating them.
- Prep Time: 20 minutes
- Cook Time: 30 minutes
- Total Time: 50 minutes
- Yield: 6–8 Sandwiches 1x
Ingredients
- 8 large eggs
- 1/4 cup whole milk
- 1/4 teaspoon salt
- may use 1/2 pound of 1 pound of Breakfast Sausage, here I used 1 pound
- 1/2 cup shredded monterey jack cheese or mozzarella cheese
- 6 English Muffins
Instructions
- Preheat the oven to 350F
- Heat the skillet over medium heat and add about 2 tablespoons of avocado oil. Allow the oil to get hot.
- Add the sausage and allow it cook through, while breaking it up with your cooking utensil. Mix the sausage a few times throughout its cooking time.
- Once the sausage has cooked through, transfer it to a plate lined with paper towels (this will help absorb the excess grease from the sausage). Set it aside to cool.
- Butter a quarter-sized sheet pan (about a 9×13 sheet pan) and line it with parchment paper. The butter will help the parchment paper adhere to the baking sheet (this will prevent it from moving). Also, butter the parchment paper. Set it aside.
- To a bowl, add the cracked eggs and whisk it with a fork. Add the milk, salt, cooked sausage, and the shredded cheese. Mix to combine.
- Transfer the mixture to the parchment lined baking sheet and spread it out evenly. Tap the baking sheet against the counter a couple of times to help release any air bubbles. Place it on the middle rack of the oven.
- Bake for about 20 minutes or until it has cooked through. Allow it cool in the pan for about 5 minutes. Carefully transfer it to a wired rack to cool completely.
- While the egg cools, lightly toast the english muffins in the oven at 350F for about 10 minutes.
- Cut the cooked egg into 6 large squares or into 8 squares. Or, may use a round cookie cutter that is the same size as your english muffins to help create rounds.
Assembling the Sandwich:
- Use a fork to carefully open the english muffin in half.
- Place the first piece of the english muffin on a plate. Then, add a piece of the cooked sausage egg mixture, and a piece of sliced cheese. Finally, top it with the second piece of english muffin.
- Enjoy immediately or follow the instructions below to store in the freezer.
To keep in the freezer:
- Once completely cooled, tightly wrap each sandwich individually in wax paper or in plastic wrap. Then, tightly wrap each in aluminum foil. Finally, transfer each wrapped sandwich to a freezer-safe ziptop bag, release as much air as possible, and place it in the freezer.
To Reheat:
Note: For best results, remove the amount of sandwiches needed from the freezer and place it in the refrigerator to thaw for 12-24 hours. If time permits, my preferred way of reheating the sandwiches is in the oven. It results into a nicely toasted english muffin along with melted cheese and warmed through egg sausage.
To reheat in the microwave:
- For best results, make sure the sandwich has been thawed for 12-24 hours in the refrigerator- meaning: place as many sandwiches as needed for the next day in the refrigerator to defrost.
- To reheat, wet paper towel(s) and squeeze the moisture out. Unwrap the sandwich completely from the wax paper (or plastic wrap) and the aluminum foil. Wrap the sandwich with the damp paper towel (making sure the moisture has be squeezed out).
- Use the defrost function on the microwave for 2 minutes.
- Then, use the reheat function to reheat for 30 seconds. At this point, the sandwich should be warmed through.
- If the sandwich hasn’t warmed through, flip the sandwich and reheat for another 30 seconds.
- Carefully remove the paper towel, being cautious of the steam.
- Enjoy or wrap with wax paper and aluminum foil to help keep it warm.
To reheat in the oven (which helps toast the english muffin nicely):
- For best results, make sure the sandwich has been thawed for 12-24 hours in the refrigerator- meaning: place as many sandwiches as needed for the next day in the refrigerator to defrost.
- Preheat the oven to 350F
- To reheat, unwrap the sandwich completely from the wax paper (or plastic wrap) and the aluminum foil.
- Place the thawed sandwich on a baking sheet lined with parchment paper.
- Cover the sandwich loosely with aluminum foil. Bake for 10 minutes.
- Remove the aluminum foil and bake for 5 minutes.
- If the sandwich hasn’t warmed through all the way, cover with aluminum foil again and bake until it has warmed through.
- Enjoy or wrap with wax paper and aluminum foil to help keep it warm.
